How to Jumpstart a Dead Car Battery Safely: Red to Positive, Black to Ground
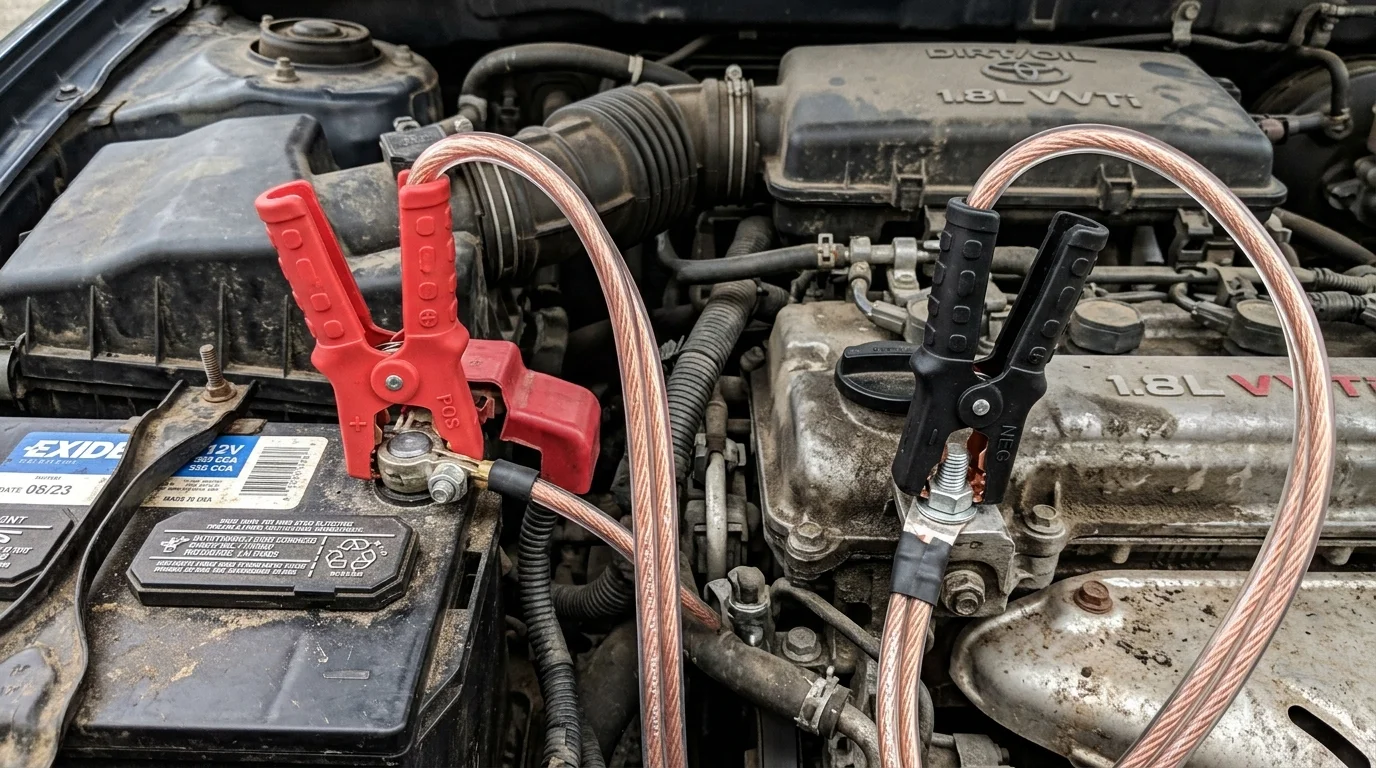
Connecting jumper cables in the correct 4-step sequence prevents sparks from igniting explosive hydrogen gas near battery terminals.
Quick Answer & Key Takeaways
To jumpstart a car safely, follow the 4-step 'Red to Positive, Black to Ground' rule: 1) Connect RED clamp to the DEAD battery's POSITIVE (+) terminal. 2) Connect the other RED clamp to the GOOD battery's POSITIVE (+) terminal. 3) Connect the BLACK clamp to the GOOD battery's NEGATIVE (-) terminal. 4) Connect the final BLACK clamp to an UNPAINTED METAL GROUND on the dead car's engine block (NEVER connect to the dead battery's negative terminal). Start the good car, wait 3 minutes, then start the dead car. Disconnect in the exact reverse order.
- Red = Positive (+), Black = Negative (-): Always verify the '+' symbol stamped on the plastic battery casing.
- Never Clamp to Dead Negative Post: Clamping to a dead battery's negative terminal creates a spark directly over venting hydrogen gas, which can trigger an explosive battery rupture.
- Reverse Removal Order: Disconnect Black from ground first, Black from good car, Red from good car, and Red from revived car last.
- Drive for 30 Minutes: Keep the revived engine running and drive at highway speeds for at least 30 minutes to allow the alternator to recharge the 12V battery.
Why Car Batteries Die & The Chemistry of Explosive Hydrogen Gas
Lead-acid 12-volt automotive batteries generate electricity through an electrochemical reaction between lead plates and sulfuric acid.
During discharging and rapid charging, lead-acid batteries emit highly flammable hydrogen gas through their plastic casing vents.
According to safety warnings from the Battery Council International (BCI), creating an electrical spark directly on or near a depleted battery's terminals can ignite venting hydrogen fumes, resulting in an acid explosion that sprays concentrated sulfuric acid into the technician's eyes and face.
Tools Required: Heavy-Duty Jumper Cables vs. Lithium Jump Packs
Before attempting a jumpstart, inspect your equipment:
- Heavy-Gauge Jumper Cables: Choose 4-gauge or 6-gauge copper cables with rubber-insulated spring clamps. Cheap 10-gauge cables overheat quickly when cranking high-compression engines.
- Portable Lithium-Ion Jump Starters: Self-contained battery power banks capable of delivering 1,000+ peak cranking amps without needing a second donor car.
- Eye Protection: Always wear safety glasses or sunglasses to protect your eyes from accidental sparks.
The Foolproof 4-Step Connection Sequence (Red to Positive, Black to Ground)
Position the donor vehicle so the two engines are close but the vehicles do not touch each other. Turn off the ignition, headlights, and climate blowers in both cars. Engage the emergency parking brake on both vehicles.
RED Clamp to Dead Battery Positive (+)
Attach one RED (positive) clamp to the positive terminal of the dead battery. Look for the red plastic cover or the large "+" symbol stamped into the lead casing. Ensure the copper jaws bite firmly through any white corrosion powder.
RED Clamp to Booster Battery Positive (+)
Attach the other RED (positive) clamp to the positive terminal of the good donor battery.
BLACK Clamp to Booster Battery Negative (-)
Attach the BLACK (negative) clamp to the negative terminal (marked with a "-" symbol) of the good donor battery.
BLACK Clamp to Unpainted Engine Metal Ground (NEVER Negative Post)
This is the most critical safety rule in automotive jumpstarting:
Connect the remaining BLACK (negative) clamp to an unpainted metal bracket, engine lift eyelet, or clean unpainted chassis bolt on the dead car, stationed at least 18 inches away from the dead battery.
Why Grounding Matters: The final cable connection always produces an inevitable electrical arc spark. Grounding to raw engine metal ensures this spark occurs safely away from the battery's flammable hydrogen gas vents.
Starting the Engines & The Reverse Disconnection Sequence
Once connected:
- Start the Donor Vehicle: Let the good car run at idle (or approx 2,000 RPM) for 3 to 5 minutes to send surface charging current into the dead battery.
- Crank the Dead Vehicle: Turn the key or press the push-start button. The engine should turn over smoothly.
- The Reverse Disconnection Sequence: Once running, remove cables in the exact reverse order:
- Disconnect Black clamp from the grounded metal.
- Disconnect Black clamp from the donor battery negative.
- Disconnect Red clamp from the donor battery positive.
- Disconnect Red clamp from the revived battery positive.
How Long to Drive Afterward: Alternator Recharge Guidelines
Do not turn off the engine immediately after disconnecting cables.
An automotive alternator requires sustained engine RPM to recharge a deeply drained 12-volt battery. Drive the vehicle continuously on streets or highways for at least 30 to 45 minutes before shutting down the ignition. If the vehicle fails to restart the following morning, the battery has suffered internal cell degradation and requires replacement.
Interactive Knowledge Check
Question: When jumpstarting a vehicle with a dead battery, where should the final BLACK (negative) jumper cable clamp be attached?
Authoritative Sources & Regulatory References
Content and statutory guidelines in this guide are verified against official state vehicle codes, federal transportation standards, and authoritative regulatory documentation:
- NHTSAVehicle Battery Maintenance and Jump-Starting Safety Protocols(National Highway Traffic Safety Administration)
- BCIBattery Safety Standards and Explosive Gas Mitigation(Battery Council International)
- AAAHow to Safely Jump Start a Car with Dead Battery(American Automobile Association)
90% of people found this article helpful.
Click a star to add your vote
292 votes • average 4.54 out of 5
Official 2026 DMV Practice Tests by State
Select your state to practice real exam questions based on the latest 2026 driver handbook.
Ready to Pass the DMV Test on Your First Try?
Practice real 2026 DMV questions with instant answer explanations, simulated timers, and pass-guarantee study guides.
Start Free Practice TestRecommended Driver Guides
The Pre-Drive Safety Inspection Checklist: What Examiners Check Before Starting
How to Choose the Right Car Wash: Touchless vs. Soft-Cloth vs. Hand Wash